Learn how to add low-cost, high-impact E2E tests for Xperience by Kentico admin UI extensions using Playwright, AI agents, and reusable skills.

Virtual Inbox, Real Tests: AI-driven E2E automation for Xperience by Kentico membership flows
You just used an AI agent to refactor your member registration flow. It looked right. The agent was confident, so you shipped it.
Three days later, a high-priority support ticket arrives: new members aren't receiving their confirmation emails. The registration link is broken. New customer acquisition has dropped to zero.
The agent didn't break your C# logic. It broke your email template variable reference, something no unit test covers, no compiler catches, and no one thought to manually test after a refactor that didn't touch the email template directly.
This post was written for Xperience by Kentico v31.2.0. Please consult the documentation for any feature or API changes when using a different version. Be sure to check the System Requirements in the product documentation.
The code featured in this post is publicly available in the Xperience by Kentico Labs: E2E Testing repository on GitHub.
The speed of AI requires guardrails
With Xperience by Kentico's ASP.NET Core and Identity foundation, strong support for membership scenarios, and extensibility, marketing teams can have full control over engaging and business-critical member-based experiences.
Combine this with developers using AI agents to write code quickly, and tailored membership functionality can be created and deployed more quickly than ever. But speed without confidence is just faster risk. This can accelerate the introduction of subtle regressions in key areas:
Registration
Login
Password recovery
These are exactly the kinds of business-critical membership experiences you can't afford to break. They are often the first impression visitors have actively engaging with your brand, directly impacting conversions and revenue.
Membership flows require a different kind of automated testing
These flows:
Are multi-step and stateful
Cannot be simulated with high fidelity through automated unit tests
Often have a common gap in automated test coverage: email
Email is a key complementary channel to the web or mobile portion of the member flow with content like confirmation links, reset tokens, and welcome messages.
Membership scenarios clearly benefit from automated end-to-end (E2E) tests that orchestrate email into the process instead of abstracting it away.
In traditional software projects, E2E tests are brittle and costly.
Thankfully, Xperience by Kentico's continuous integration support means developers have full control over ever piece of code, content, and configuration in their development environment. We don't have to worry about other users changing pages or content and breaking tests. If something breaks it's because we (or our AI agent) made that change.
Although the benefit of E2E tests is clear, there's still the question of cost. To significantly reduce that cost, developers need better testing technology for these scenarios.
The solution: Xperience by Kentico Virtual Inbox
Xperience by Kentico Virtual Inbox is a "Lab" integration hosting an in-application virtual inbox that enables developers and administrators to fully test email channels without the need for a live email delivery service.
Most importantly, this doesn't rely on mock emails, because they are fully rendered and registered as "sent" according to Xperience by Kentico's email delivery system. Emails are captured and available for visual validation within Xperience's administration UI.
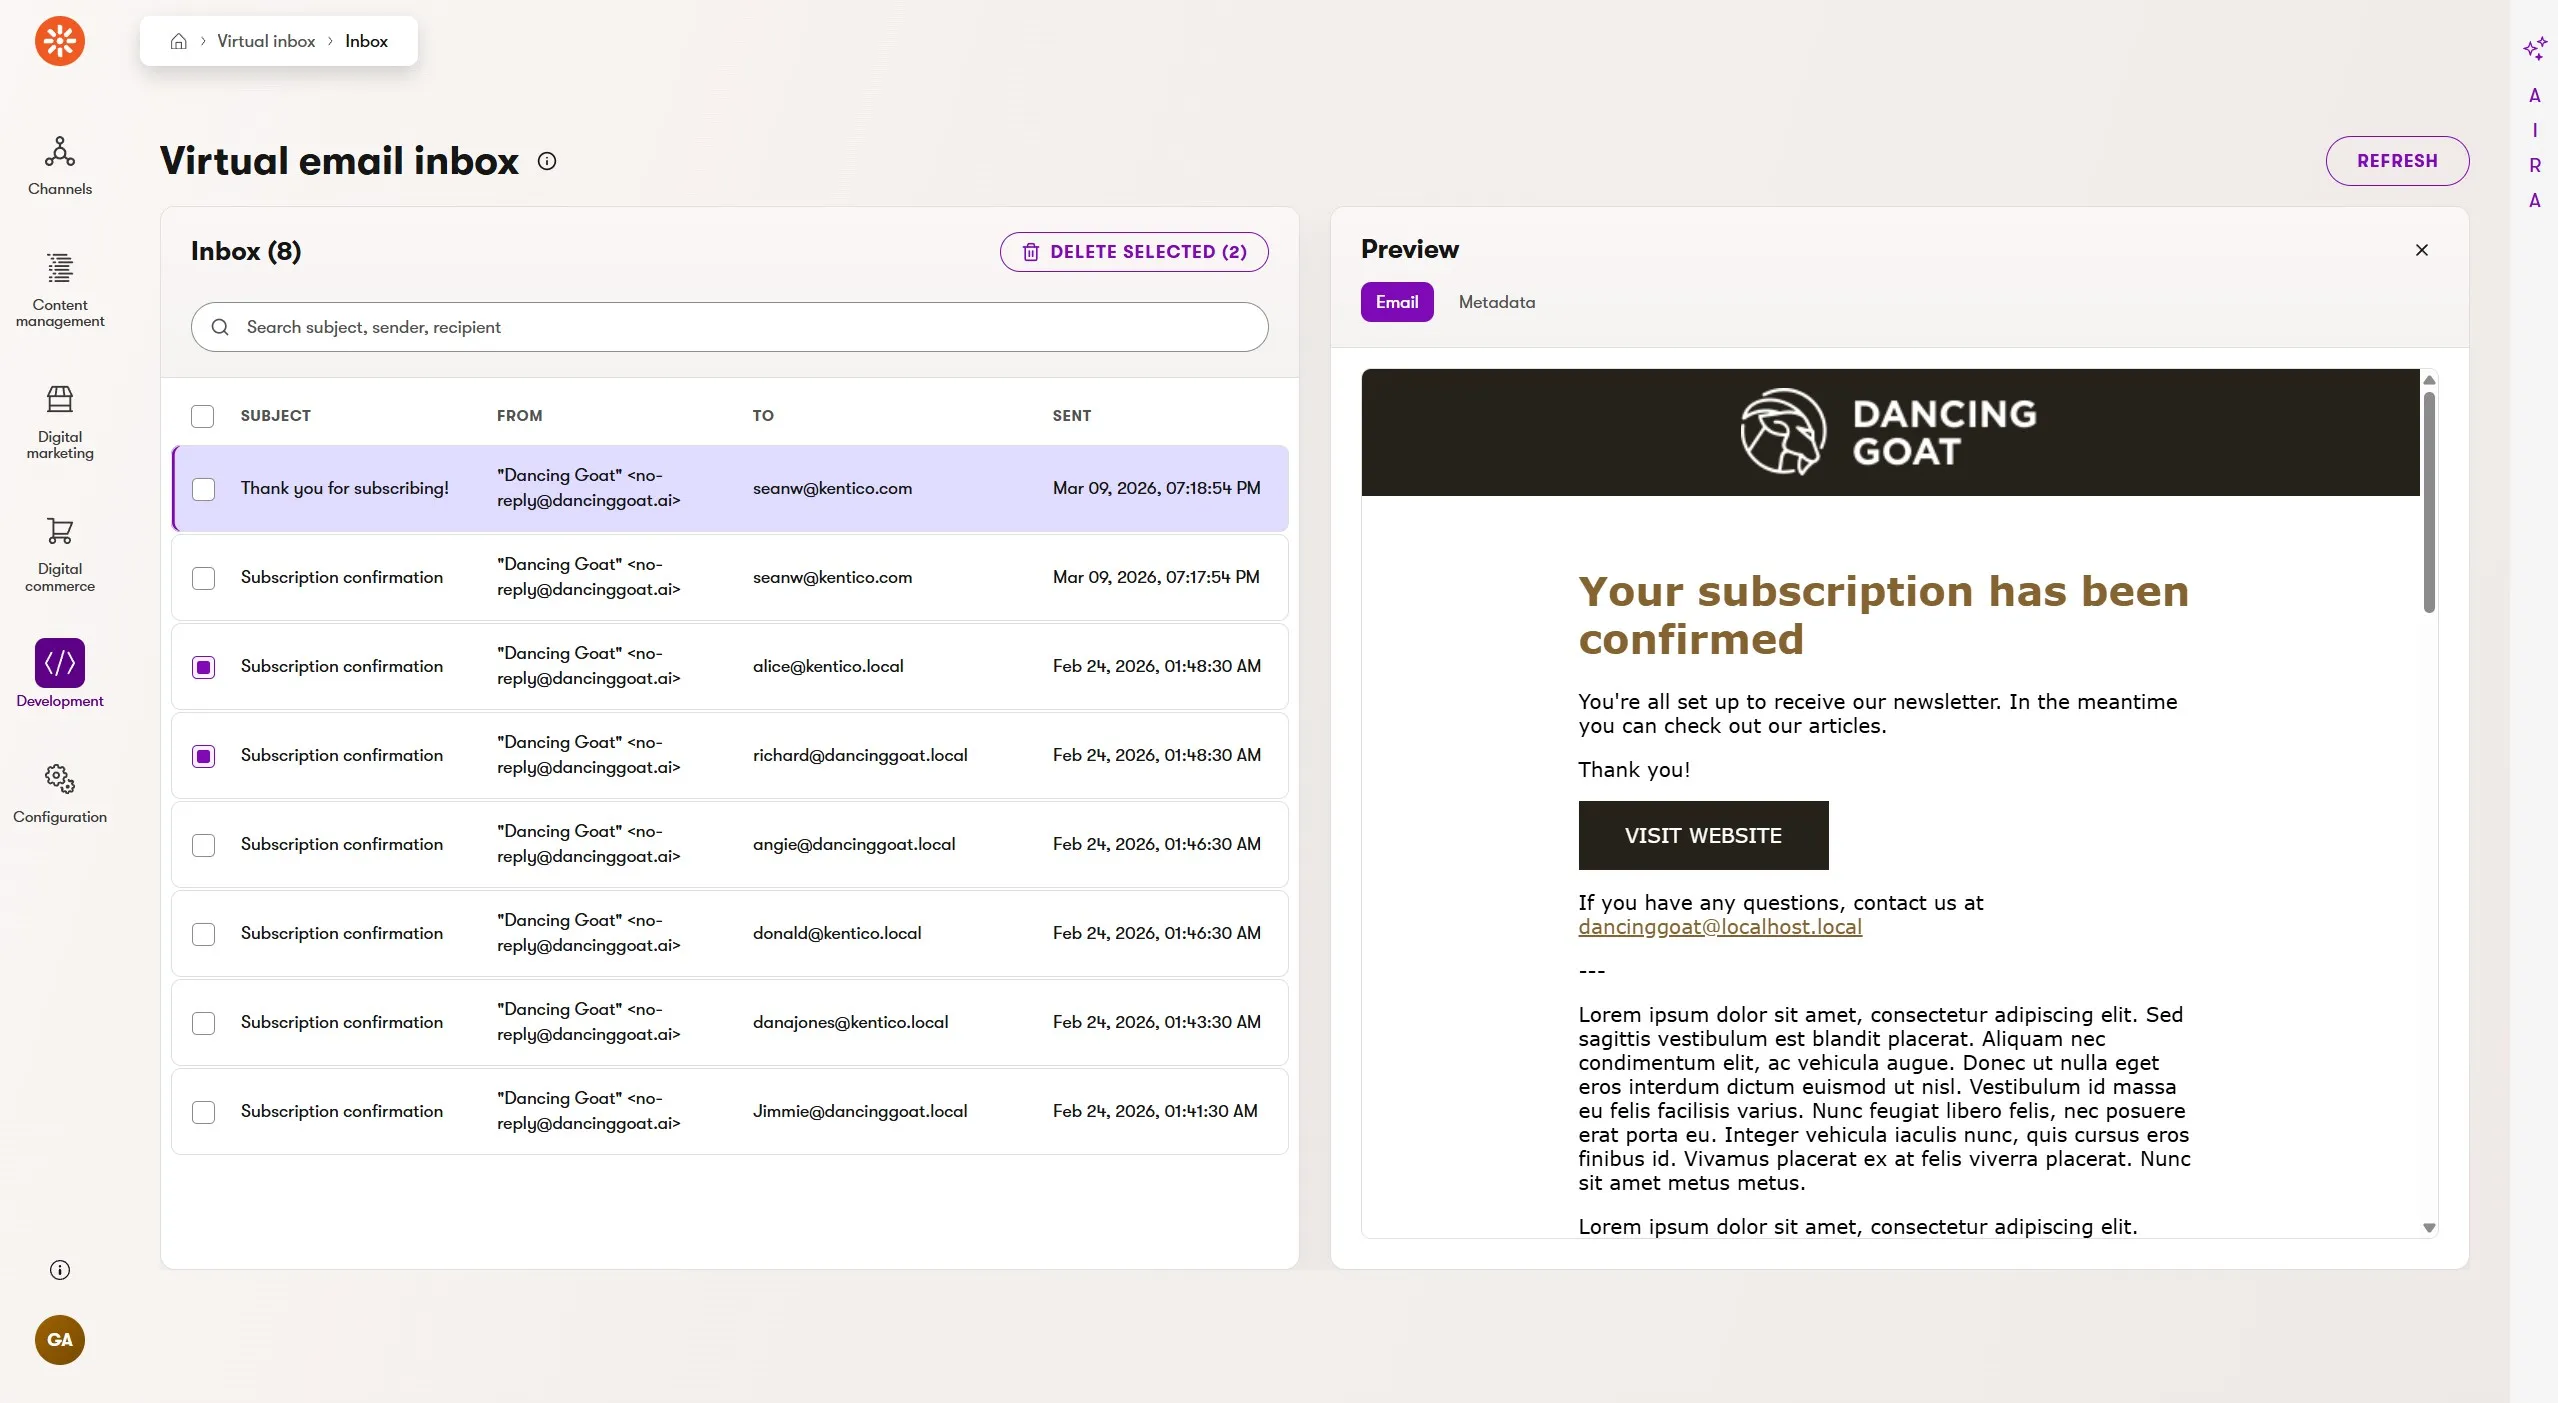
This integration is also part of KentiCopilot, and thanks to its MCP server tools, AI agents can interact with and validate email-dependent features in Xperience by Kentico applications.
What are some use cases for this integration?
AI agent validation of email content and rendering after code changes.
AI agent-driven E2E testing of visitor journeys, like automations and membership experiences.
AI agent-driven customer data generation to validate marketing features like activity tracking for emails and custom activities, content personalization, and customer journeys.
Environments that need email "delivery" without delivering to a real inbox.
"View this email in your browser" by displaying captured email on a website channel.
Maintain a clean email queue when you don't have SMTP delivery support in your environment.
Installing the Virtual Inbox
To enhance our app with the Virtual Inbox features for local email testing, we first add the required NuGet packages.
dotnet add package Kentico.Xperience.VirtualInbox.Admin- adds the virtual inbox administration UI applicationdotnet add package Kentico.Xperience.VirtualInbox.MCP- adds Virtual Inbox MCP tools that you can register on your application's MCP server
Next, we follow the quick start instructions in the README.
First, we register services in the DI container for both the Virtual Inbox integration and the MCP server our app will host. Then we configure the MCP server middleware.
if (env.IsDevelopment())
{
   builder.Services
     // Adds this library's services
     .AddVirtualInboxClient(builder.Configuration)
     // Host application is responsible for adding the McpServer
     .AddMcpServer()
     .WithHttpTransport()
     // Adds this library's MCP tools
     .WithVirtualInboxTools();
}
else
{
   // Adds this library's services without email capture
   builder.Services.AddVirtualInboxCore();
}

// ...

app.Kentico().MapRoutes();

if (env.IsDevelopment())
{
   // Host application is responsible for adding the endpoint
   app.MapMcp("/mcp");
}
Next, we update our appsettings.Development.json to enable the Virtual Inbox integration for the local environment.
"Kentico": {
   "VirtualInbox": {
     "Enabled": true,
   }
 },
Finally, we configure our app as an MCP server (via mcp.json) to expose the emails to AI agents.
{
  "servers": {
    "kentico.docs.mcp": {
      "type": "http",
      "url": "https://docs.kentico.com/mcp"
    },
    "your-app": {
      "type": "http",
      "url": "http://localhost:23146/mcp"
    }
  }
}
Now, we can set up our test automation tools.
E2E test automation with Playwright
In the past, setting up automated testing in an application was, at best, challenging and configuring reliable E2E test infrastructure was painful.
Thankfully, that's no longer true with frameworks like Playwright. The onboarding experience for a developer couldn't be simpler.
Setting up your testing tools
For the following examples, I'm using a slightly customized Dancing Goat project that has the default membership features but also requires email confirmation.
To start, we can follow the instructions in the official documentation.
npm init playwright@latest
You'll be prompted to select from a few options. Here are the options I selected:
TypeScript or JavaScript: TypeScript
Tests folder name:
testsAdd a GitHub Actions workflow: yes
Install Playwright browsers: yes, only Chromium
Playwright will generate a package.json, tests folder, and playwright.config.ts file. At the bottom of the config file, you'll see a section for webServer. This is where we'll add our Xperience by Kentico application details.
webServer: {
  command: 'dotnet run --project ./src/DancingGoat',
  url: 'http://localhost:44985',
  reuseExistingServer: !process.env.CI,
},
If a process is already using the configured port (e.g. you are running dotnet watch), reuseExistingServer ensures Playwright will run tests against the running application but if no app is running it will start one, except in CI environments where we assume nothing is running yet.
If you are working in VS Code, you'll also want to install the Playwright Test extension for a more fully featured test development experience.
Running all your tests (currently just the placeholder example.spec.ts test) can be performed through the VS Code extension or by running npx playwright test at your terminal.
You'll also want to add two more libraries that we use later our E2E test code.
npm install @modelcontextprotocol/sdk cheerio
Running E2E tests in a CI pipeline
Running our tests locally is great, but that's only half the value of test automation. We also want to run our tests during pull requests in a CI pipeline and validate every code update from developers and AI agents.
During setup, Playwright adds a GitHub workflow .yml file, preconfigured to run the example tests. We need to adjust this to test a running instance of an Xperience by Kentico application.
This is surprisingly easy to enable, especially with AI agents that are quite capable at writing YAML and Bash. They also understand GitHub Actions.
We need to extend the boilerplate .github/workflows/playwright.yml.
Add support for .NET restore and build and .NET global tools
Start MS SQL Server as a Docker container
Create a new Xperience by Kentico database
- Add a valid license key
- Optional: Restore your CI repository
The first enhancement only requires a few GitHub actions.
- uses: actions/setup-dotnet@v5
  with:
    global-json-file: global.json
- name: Restore .NET dependencies
  working-directory: .
  run: dotnet restore
- name: Build .NET solution
  working-directory: .
  run: dotnet build --no-restore
- name: Restore Dancing Goat tools
  working-directory: examples/DancingGoat
  run: dotnet tool restore
Docker is already included in Linux-based GitHub workflow environments, so we can pull the MS SQL Server Linux container with some default settings and make sure it's up and running before proceeding.
- name: Start SQL Server
  run: |
    docker run --name xperience-sql \
      -e ACCEPT_EULA=Y \
      -e MSSQL_SA_PASSWORD="$SQL_SERVER_SA_PASSWORD" \
      -p 1433:1433 \
      -d mcr.microsoft.com/mssql/server:2022-latest
- name: Wait for SQL Server
  run: |
    for attempt in {1..60}; do
      if docker exec xperience-sql \
        /opt/mssql-tools18/bin/sqlcmd \
        -S localhost \
        -U sa \
        -P "$SQL_SERVER_SA_PASSWORD" \
        -C \
        -Q "SELECT 1" \
        >/dev/null 2>&1; then

        exit 0
      fi

      sleep 2
    done

    docker logs xperience-sql
    exit 1
Creating the Xperience database is also trivial because the kentico-xperience-dbmanager .NET tool handles everything for us.
The license file is stored as a GitHub Action secret in the repository and retrieved in the workflow through the secrets['...'] syntax.
- name: Install Xperience database
  working-directory: examples/DancingGoat
  env:
    KENTICO_LICENSE_FILE: ${{ secrets['KENTICO_LICENSE_FILE'] }}
  run: |
    if [ -z "$KENTICO_LICENSE_FILE" ]; then
      echo "Missing KENTICO_LICENSE_FILE secret."
      exit 1
    fi

    license_file="$(mktemp)"
    trap 'rm -f "$license_file"' EXIT
    printf '%s' "$KENTICO_LICENSE_FILE" > "$license_file"

    dotnet kentico-xperience-dbmanager -- \
      -s "$SQL_SERVER_HOST" \
      -u "sa" \
      -p "$SQL_SERVER_SA_PASSWORD" \
      -a "$SQL_SERVER_SA_PASSWORD" \
      -d "$SQL_SERVER_DATABASE" \
      --license-file "$license_file" \
      --recreate-existing-database
Playwright does the work of starting the Xperience by Kentico application through the webServer settings of the playwright.config.ts file. Did you notice the CI environment variable referenced in this file? GitHub workflows automatically set this environment variable to true, so the test configuration is optimized for our workflow runs.
The final workflow file can be seen in this post's GitHub repository where you can see it in action.
Validating a membership flow with an AI agent
Before any test code is authored, we can instruct our AI agent to proceed through the member registration and email confirmation process.
To give the AI agent the ability to visit and interact with a web page, we can add the Chrome DevTools MCP server to our project.
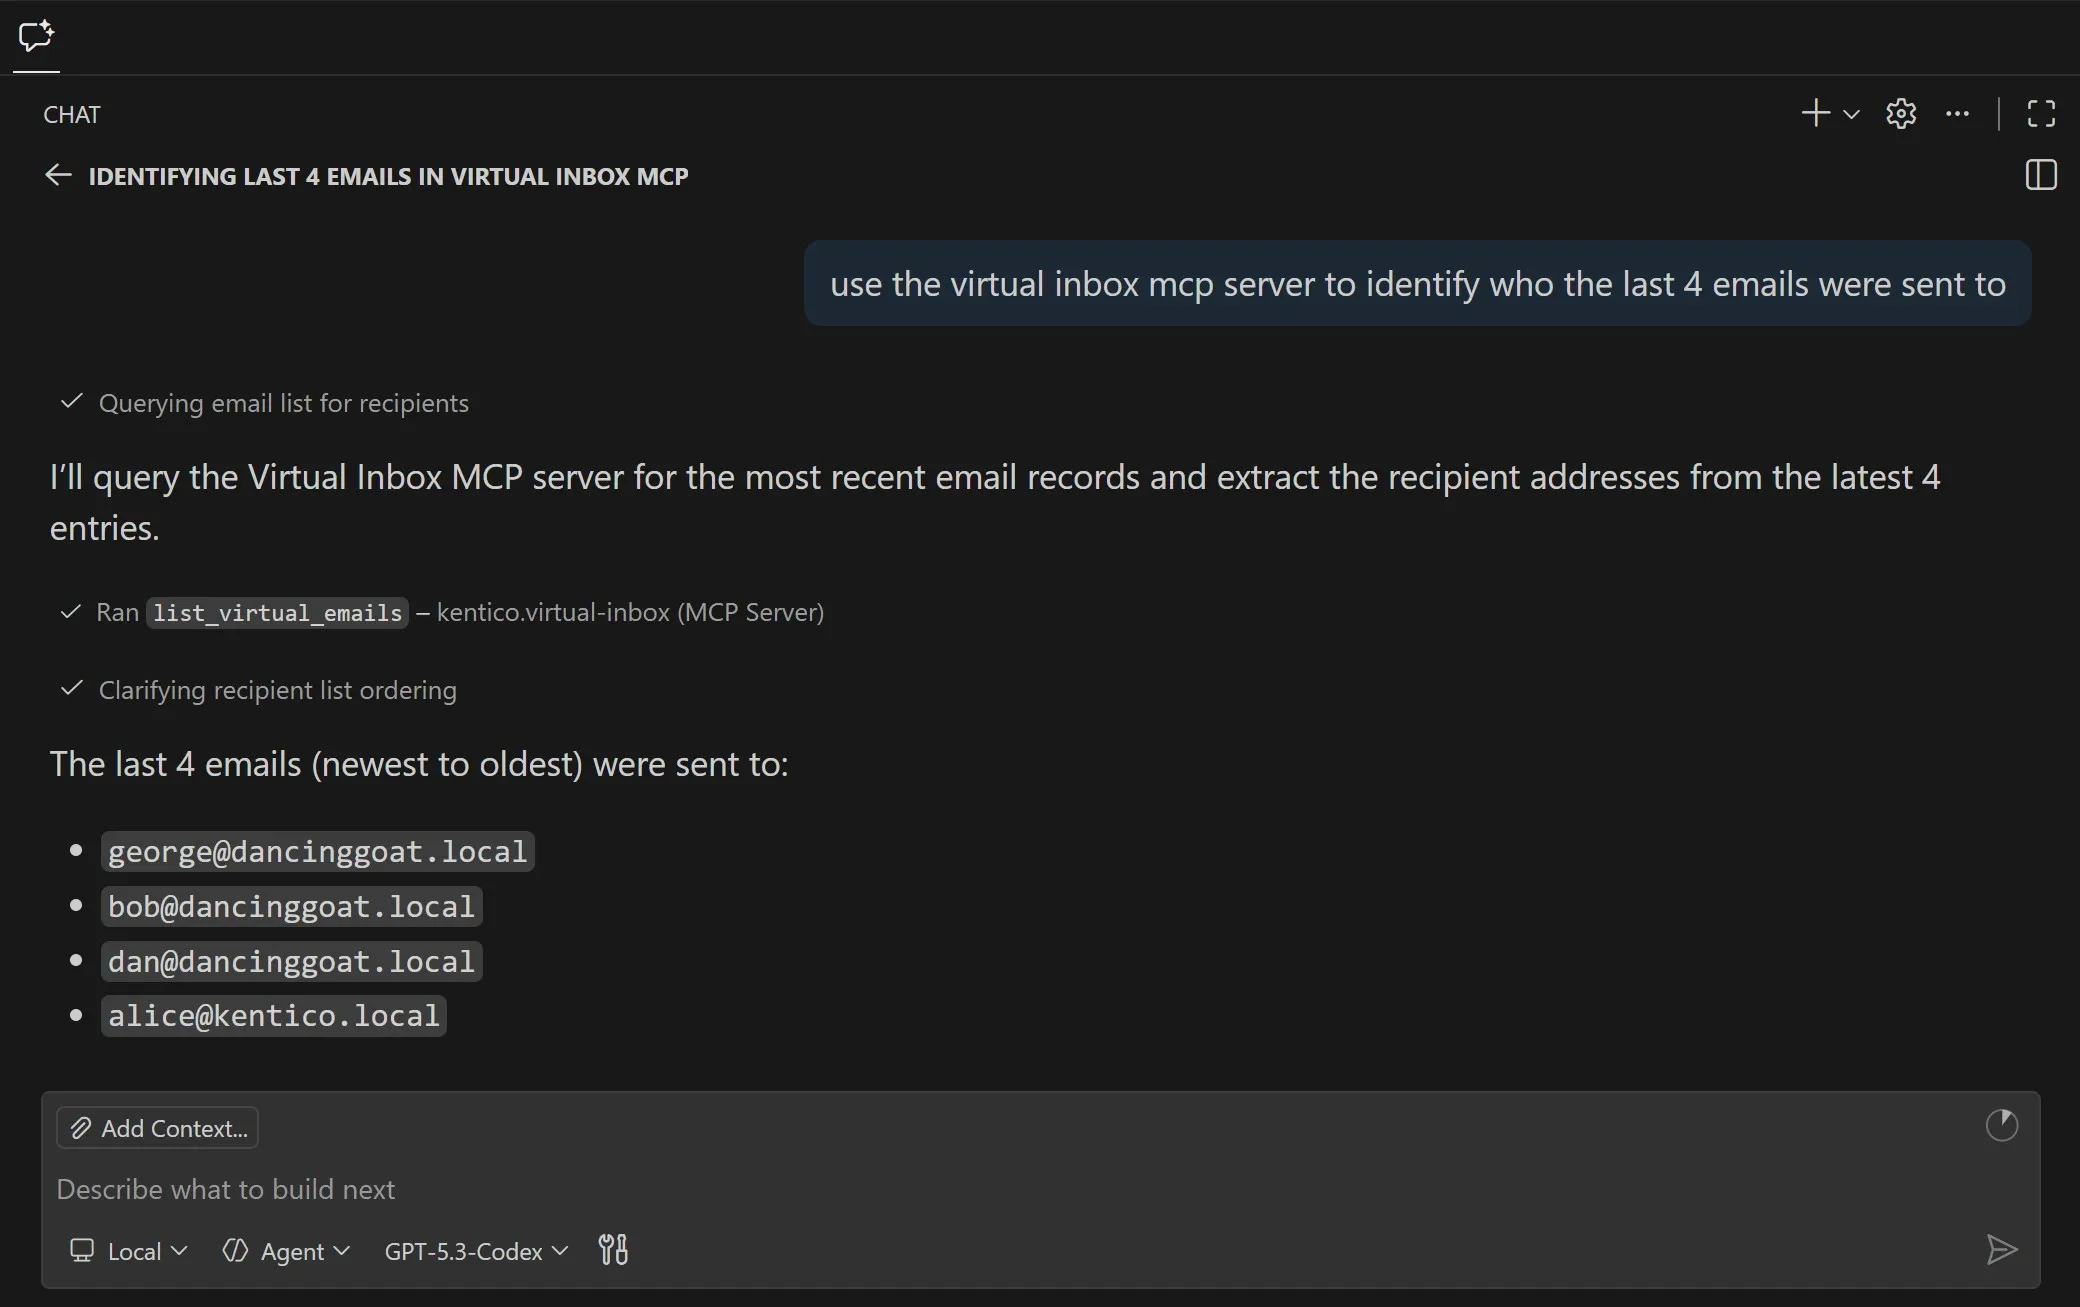
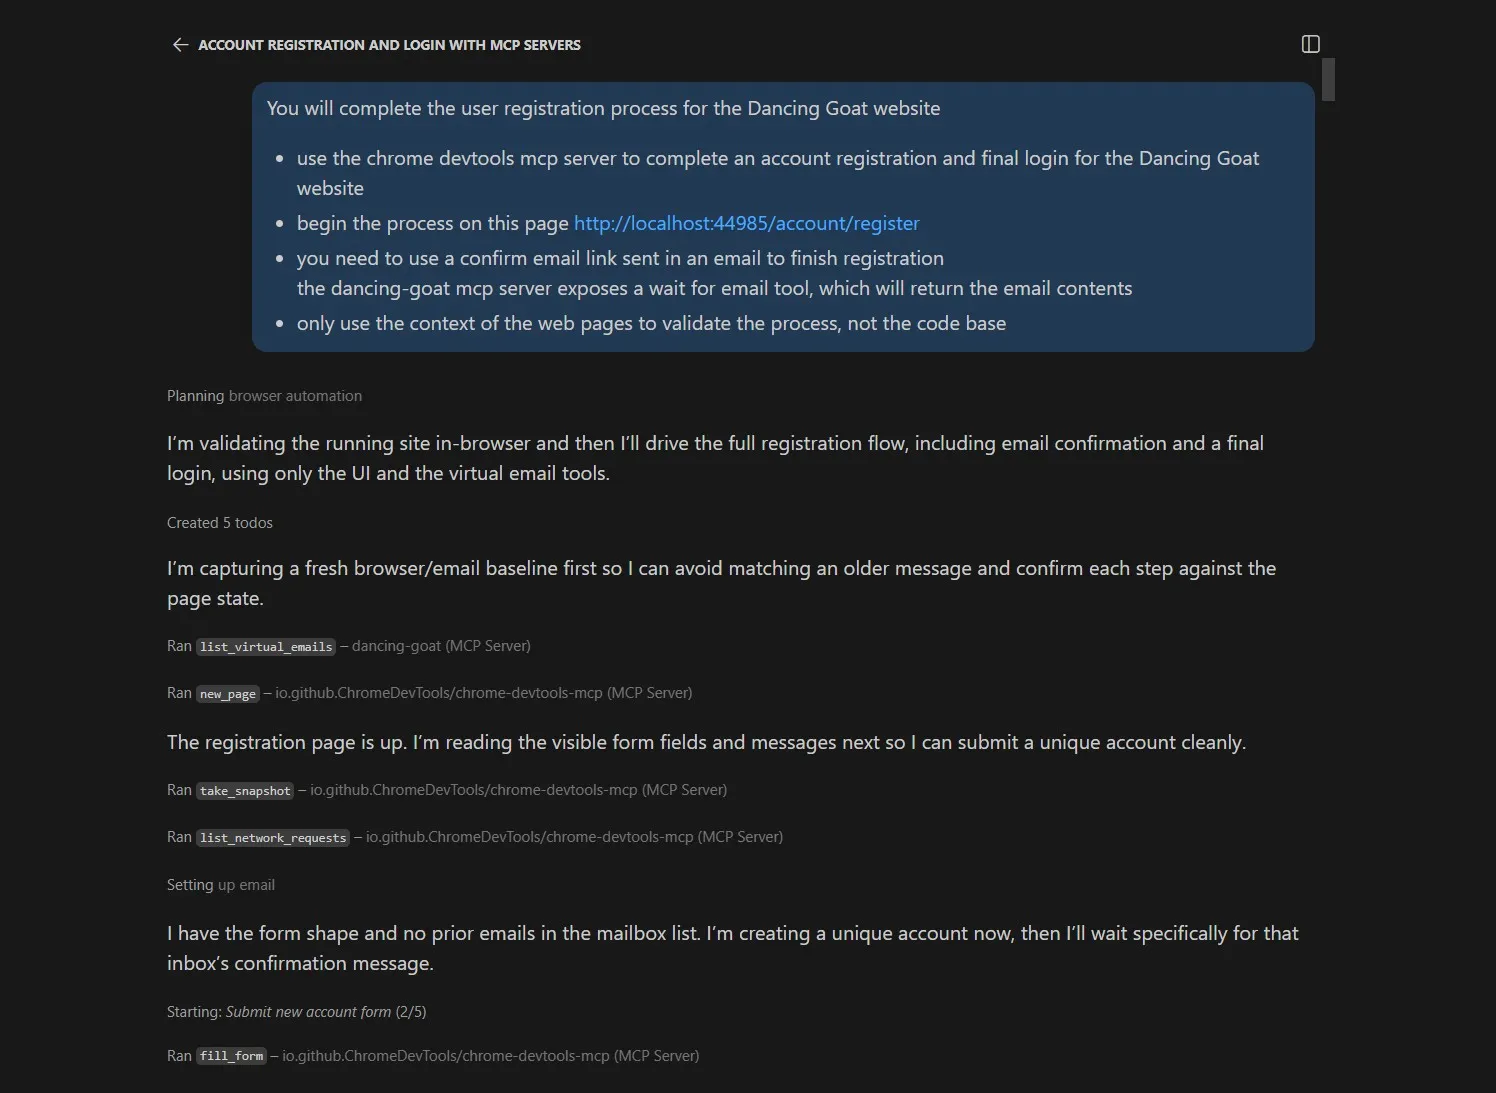
With our application running to expose the Virtual Inbox MCP tools, we prompt our AI agent to run through the workflow we want to test.
You will complete the user registration process for the Dancing Goat website
use the chrome devtools mcp server to complete an account registration and final login for the Dancing Goat website
begin the process on this page http://localhost:44985/account/register
you need to use a confirm email link sent in an email to finish registration
the dancing-goat mcp server exposes a wait for email tool, which will return the email contents
only use the context of the web pages to validate the process, not the code base
This prompt validates a couple of things for us.
The Virtual Inbox integration and MCP server are functioning correctly
The registration process works mechanically
The registration process is well designed
The last point is important and easy to overlook. We want the AI agent to complete the registration process without knowing all the steps in advance. This means it will need to use the website itself to understand how to proceed to the next step, just like a human would.
After the agent completes the registration process, we can ask for feedback: suggestions for improvement and edge cases we didn't plan for. We then want to instruct the agent to make the suggested improvements and iterate on the flow, re-validating with each change.
Creating E2E tests for member registration
Once we've validated the membership registration process and made the AI suggested improvements, we still have the most important task to complete. We need to write an automated test to prevent future bugs in this business-critical visitor experience.
Not everything needs to be AI
This is one of those key scenarios in agentic AI software development where we want to take successful, but non-deterministic output from an AI agent and transform it into a repeatable, deterministic process.
Just because AI is a tool we can use doesn't mean it has to be the tool we always use. Code is still a fantastic and valuable tool.
Calling MCP tools with code
The first thing we need to address in our E2E test code is calling the MCP server programmatically. We could make an HTTP API endpoint to expose the same functionality as the MCP tools, but that's unnecessary.
The MCP tools return structured JSON responses, and the @modelcontextprotocol/sdk library exposes a ready-to-use client to make tool calls. We just need to supply the tool name and arguments.
We can wrap the MCP client creation into a function so it's easier to reuse.
import { Client } from '@modelcontextprotocol/sdk/client';
import { StreamableHTTPClientTransport }
  from '@modelcontextprotocol/sdk/client/streamableHttp.js';

const DEFAULT_DANCING_GOAT_MCP_URL = 'http://localhost:44985/mcp';

/**
 * Creates a connected MCP client for the Dancing Goat email server.
 *
 * Example:
 * const email = await createEmailClient();
 *
 * const message = await email.callTool({
 *   name: 'wait_for_email',
 *   arguments: {
 *     inbox: '[email protected]',
 *     subjectContains: 'Confirm your account',
 *     timeoutMs: 30000,
 *   },
 * });
 *
 * @returns A connected MCP client instance.
 */
export async function createEmailClient() {
  const transport = new StreamableHTTPClientTransport(
    new URL(process.env.DANCING_GOAT_MCP_URL
            ?? DEFAULT_DANCING_GOAT_MCP_URL),
  );

  const client = new Client({
    name: 'playwright-tests',
    version: '1.0.0',
  });

  await client.connect(transport);

  return client;
}
Code mode
When AI agents write code to call MCP server tools instead of using the tools directly, it's called code mode.
The core idea behind code mode is that it's easier for agents to write code for small scripts or a CLI than to load a large number of MCP tools into their context. Code, as we've already covered, can translate agent-based non-deterministic processes into repeatable and deterministic ones.
In a way, our E2E tests are a code tool, mostly written by AI agents, and used to validate that the application behaves as expected. It's not exactly "code mode", but it's close.
Using our AI agent to generate the test code
We already provided the AI with context about the registration flow we're interested in validating and the agent also discovered context while going through the process using the Chrome DevTools MCP server.
Let's use that context to our advantage and prompt the agent to generate the test code for us.
generate a playwright test for this workflow you can use the emailMcpClient to "wait" for the registration email.
use the cheerio library to parse the email to find the confirmation URL.
run the playwright test and ensure the test passes.
When I ran this prompt, the agent generated a well designed test that even included a final "login successful" check at the end.
test('registers, confirms email, and signs in', async ({ page }) => {
  const suffix = Date.now();
  const username = `playwright_reg_${suffix}`;
  const email = `playwright.reg.${suffix}@example.com`;
  const password = 'P@ssw0rd123!';
  const emailClient = await createEmailClient();

  try {
    await registerAccount(page, username, email, password);

    const message = (await emailClient.callTool({
      name: 'wait_for_email',
      arguments: {
        inbox: email,
        subjectContains: emailSubject,
        timeoutMs: 30000,
      },
    })) as WaitForEmailResult;

    expect(message.isError).not.toBe(true);

    const virtualEmail = message.structuredContent;

    expect(virtualEmail).toBeTruthy();

    if (!virtualEmail) {
      throw new Error('wait_for_email did not return structuredContent.');
    }

    const confirmationUrl = extractConfirmationUrl(virtualEmail);

    await page.goto(confirmationUrl);

    await expect(page.getByRole('heading', { name: 'Email confirmed' }))
      .toBeVisible();
    await expect(page.getByText('Your email address has been confirmed.'))
      .toBeVisible();

    await page.getByRole('link', { name: 'GO TO SIGN IN' }).click();

    await expect(page.getByRole('heading', { name: 'Sign in' }))
      .toBeVisible();

    await page.getByLabel('User name').fill(username);
    await page.getByLabel('Password').fill(password);
    await page.getByRole('button', { name: 'Sign in' }).click();

    await expect(page).toHaveURL('http://localhost:44985/');
    await expect(page.getByRole('img', { name: 'avatar' }))
      .toBeVisible();
  } finally {
    await emailClient.close();
  }
});
We bring these technology pieces together to create a harness: something to guide the decisions, actions, and output of AI agents.
If you want to validate the CI pipeline test results in GitHub, it's only a few steps:
Navigate to the artifacts for a specific workflow run.
View the artifact's
index.htmlPlaywright report in your browser

The payoff and takeaways
Automated E2E testing doesn't only help guide AI agents. It increases developers' confidence that AI-driven application updates don't just build and deploy successfully; they also run correctly and consistently.
We've only created a test for member registration. What other membership and email-channel use cases could we cover with these new tools?
Password recovery flow: same pattern, different email type
Welcome email content assertions: did the right Email Builder personalized content render based on the visitor's activities?
Double opt-in newsletter subscription flows: testing recipient lists and marketing automations
Email Builder template and component regression testing: did a template content edit break a dynamic field or did a component refactor result in missing content?
Account lockout and other security notification emails
Thanks to Playwright, AI agents, and the Virtual Inbox MCP server, all of these and more are within our E2E testing capabilities without a significant amount of effort.
We can quickly, continuously, and confidently update our Xperience by Kentico projects with AI assistance.
If you liked this article, be sure to check out the follow up blog post which focuses on using AI to generate E2E tests for extensions to Xperience by Kentico's administration UI interface.

Sean Wright
I'm Lead Product Evangelist at Kentico. I'm part of the Product team at Kentico along with David Slavik, Dave Komárek, Debbie Tucek, Martin Králík, and Martina Škantárová. My responsibilities include helping partners, customers, and the entire Kentico community understand the strategy and value of Xperience by Kentico. I'm also responsible for Kentico's Community Programs.